I guess it’s a natural evolution in the 3D printing world that the mess of wires and rods and motors and gears that make up a 3D printer would eventually give way to a sleek, elegant look similar to that of the custom car world. Today there are a few commercial printers designed to be stylish and some are really quite nice in appearance, however the DIY community has done little to customize these futuristic machines of magical capability.
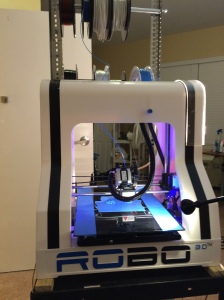
Take a look at this image of my stock ROBO 3D R1 printer with it’s sewing-machine like cowling and black accent stripes. Those stripes… it was the stripes that made me think of car paint. If I were to fix up my ROBO, I’d paint it candy apple red with white racing stripes! Yeah, that’s the ticket. Next thing you know I’d dreamed up a custom hand-wired linear power supply complete with toroidal transformer and open wire construction, a totally new way of driving the machine from mp3 files, and some chrome plating to reflect the custom LED light show – wow what a ROBO that would be! And what a run-on sentence too!

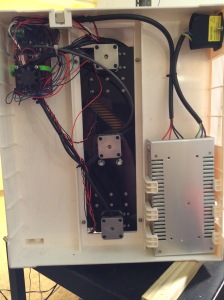
All that daydreaming and imagineering led me to take a really good look a the rat’s nest of wires underneath the machine with all it’s overheating and sparking problems, the noisy switching power supply, and that tease of an SD card reader that never worked. Ugh, what a mess! I decided to replace everything but the mechanicals and motors. See the underside image and look but don’t stare at the ugliness of it all. OK, I exaggerate but really it’s not pretty underneath an early adopter ROBO printer. I decided to change this.
Enter my audio driver concept. Before I had a 3D printer, I was eager to experiment with something of the sort so I decided to build a 3D printed stepper motor with custom controller. Normally you drive a stepper with a little stepper driver board that costs around $10 to $20 each, and you need four of them for the ROBO’s five steppers (the two Z-motors operate in concert). Then you plug these four mini boards into a RAMPS board containing electronics driver circuitry and you plug the RAMPS board into an Arduino processor board. USB connects to the Arduino from the computer and the computer feeds commands to the Arduino to make the printed object. That’s another run-on sentence that tells you the overall structure of the printer’s operation in a nutshell. My concept is totally different.
One chip I absolutely adore is the ATtiny85 processor. It’s like a teeny little Arduino in an 8 pin package that offers five pins of I/O that are free to use however you like. The pins offer digital I/O, analog input, and PWM output though not every pin does every function so you have to study the thing to know how to make best use of it. Well, long story short I came up with a way to control a 3D printed stepper motor with four power transistors and one ATtiny85 chip. That’s only three dollars or so of parts and you can program the processor to do anything you want. What I did was make it audio responsive. I had the computer send out what sounded like musical tones that controlled the stepper. With such an approach it might be possible to drive the printer from an mp3 file instead of the complex G-code files in use conventionally.
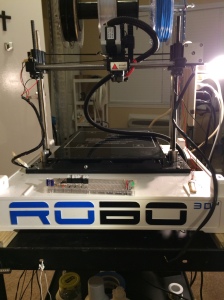
Fast forward to today and I’ve decided to blog it up and record my adventure into Hot Rodding the ROBO 3D R1 printer! See the photo nearby for a view of the stripped-down ROBO ready for experimentation. The first order of business will be to control the X-motor with an audio signal using the custom ATtiny85 chip and some power transistors. So I unwrapped the wire guide that held the limit switches in place and unplugged the X-axis stepper motor cable, bringing it out to the front of the ROBO where it can be connected to a circuit board, as shown in the photo.

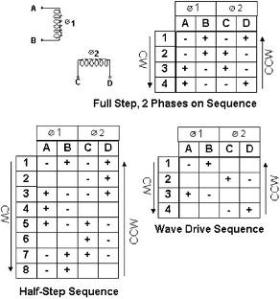
Next thing to do was to look up the stepper motors and see how to control the signals. I did make a video of the plastic stepper motor driver in action here: https://www.youtube.com/watch?v=gFPdd0DUh3Y and these illustrations describe how the stepper motor is to be driven:
OK I was able to program an Arduino Uno R3 board to drive a stepper motor at 5Volts. The circuit has eight transistors (four NPN and four PNP), eight resistors (one for each transistor input), and four LEDs (one per coil side). It uses eight pins of the Arduino board because I wanted full control of each transistor for experimentation purposes and the possibility of using half steps. You can see a video of the result in action: https://www.youtube.com/watch?v=j8sAv7L82Ps
As mentioned in the video, I have used the Arduino Uno R3 board with the Makershed breadboard shield for experimentation and testing, however I feel that it will be even lower cost and less work to do the job with some ATtiny85 Arduino chips, each of which can control two stepper motors. I will use DTMF encoding as a simple way to control the printer instead of g-code.
The use of DTMF to control the printer opens up many possibilities. DTMF tone sequences can be stored in mp3 or other format music files, so to run a print all you need is a music player. Also DTMF tones can be sent via telephone all over the world so printers can be run remotely or prints effectively faxed from one location to another without the need for special equipment.
The DTMF standard allows up to 16 buttons and three control codes to be transmitted. This means that a single channel of low performance audio can control a 3D printer with up to eight stepper motors or other driven features. Also since only four ATtiny85 chips are needed to drive all eight signals (plus a total of 32 resistors and 32 transistors if using bipolar transistors), cost is greatly reduced. Also it is possible to run all but the heaters from USB and possibly run the heaters from a small power supply or additional USB power sources.
Tonight I plan to breadboard and program control of all five steppers on the ROBO3D printer – wish me luck!


Sounds like a fun project, especially the use of the dtmf tones.A sweet marriage of the modern and the retro technologies.
LikeLiked by 1 person
Ty John, should be fun at any rate, and low in cost too!
LikeLike
You, Sir, are a nut… :-p
Have fun!
LikeLiked by 1 person
So true!
LikeLiked by 1 person
I’m in awe of you guys. I have a notion that when I buy a 3d printer it will be a shiny lidded corporate box;and inscribed thereon in scary runes CONTAINS NO USER SERVICEABLE PARTS. Not as much fun as you’re having!
LikeLike
It certainly is a lot of fun, Ixmal!
Les
LikeLike